Made to measure Mandala Centrepiece Design, ideal for a meditation or yoga room, a bathroom or bedroom. The design is available either transparent or in colour on a frosted background. You can also request the size of the design and where it is located on the film.
Read MoreThis design can be ordered printed in a choice of colours on etch effect film, or for a premium, we can print a frosted effect on a clear film leaving the design as see through. The clear design allows you to see out whilst the printed version gives you 100% privacy.
To order, just enter the width and the height of the pane(s) you wish to cover in CENTIMETRES. As a rule, we will print the design centrally and make it fill as much of the width or height of the pane. You can however specify a maximum width or height for the design in the Additional Requirements tab and ask to see a visual before we process your order.
The design is always printed to be applied and viewed internally on glass.
Application
The film is easy to apply using soapy water, and the felt edge squeegee which will be supplied with your order.
You can also have a look at our short video tutorial for installation tips.
Regardless of the type of window film or stickers you purchase, whether frosted, tinted, mirror or decorative, the principle on how to fit window film will be the same. We also have several targeted video tutorials which you will find by clicking here.
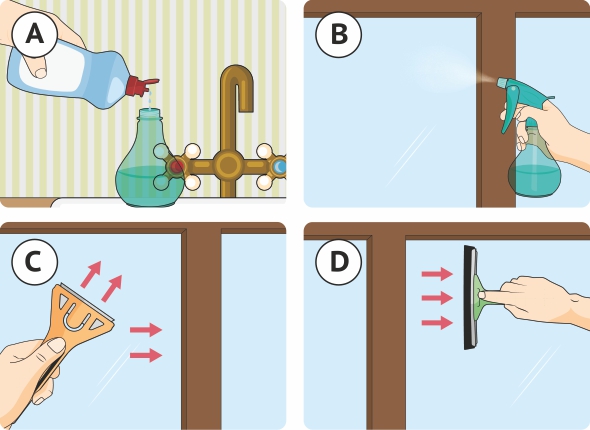
Make a slip solution using a few drops of washing up liquid mixed with water in a spray bottle and thoroughly clean the glass. Use a glass scraper to remove specks of paint, or any other glass covering like stickers.
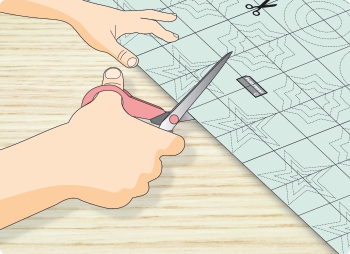
Unless your window film is already cut to size, and if the film has a paper liner with a metric grid, measure your glass at the top and bottom, and left and right and mark and cut your window film. You can also cut the film bigger than required and trim it once applied to the glass.
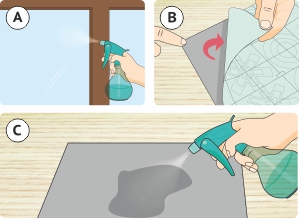
A. Thoroughly wet the glass with the slip solution.
B. Place the window film face down an a flat surface and expose a small amount of the adhesive or cling side.
C. Spray the adhesive or cling side liberally with the slip solution as you peel off the protective liner.
D. Slip the adhesive or cling side of the film on the glass butting one edge and the top against the window frame or rubber gasket (double glazed unit).
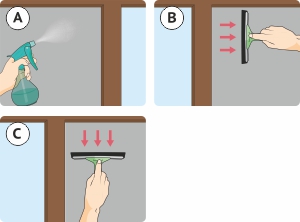
A. Liberally wet the face of the film with the solution to act as a lubricant fro your squeegee or felt edged tool.
B-C. Squeeze out the solution from under the film using a firm and even pressure, starting from the top and working your way down and across the film.
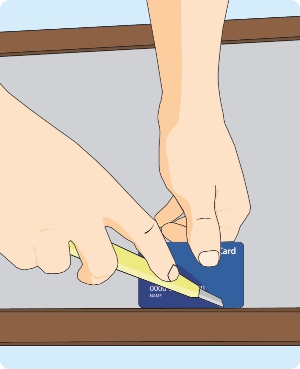
Run a credit card and a retractable knife blade down the edge of the glass to trim any excess film. The thickness of the card will allow for a small gap to help any remaining solution to be squeezed out. Once trimming is complete go over the film once more to squeeze out all the solution.
1. Make sure that all the solution has been squeezed out.
2. Wipe the film and any remaining solution with paper towel.
3. Inspect the film on both sides of the glass to check for any trapped solution or air bubbles.
Removing window film can be a very easy process, but it all depends on how long the film has been on the glass, and the type of film that was used.
Here's a video tutorial which shows the basic principal.
Typically, films are either made using PVC or PET.
PVC is a soft material which can be peeled off the glass with a glass scraper. Any glue residue can be removed with soapy water and a scraper.
PET is a brittle material widely used for solar and safety film, and might be made of layers of mettalised material. To remove this type of film, use a wide glass scraper and lubricate with soapy water to remove the film.
As a rule, old PET film are more difficult to remove than PVC films.
For large panes, it is best to first score the film into strips with a sharp knife. This means that you can tackle it in more manageable pieces.
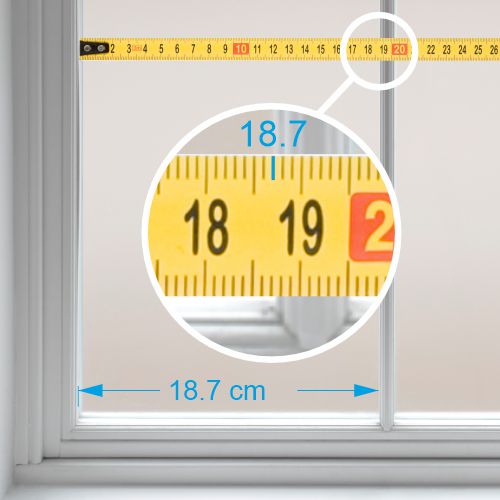
You will first need to measure the glass, in centimetres, using a tape measure. Only measure the glass you want to cover.
Width: measure from left to right at the top and the bottom of the glass, and take note of the largest measurements (some older wooden windows are not perfectly square).
Height: measure from top to bottom on the left and the right of the glass, and take note of the largest measurements.
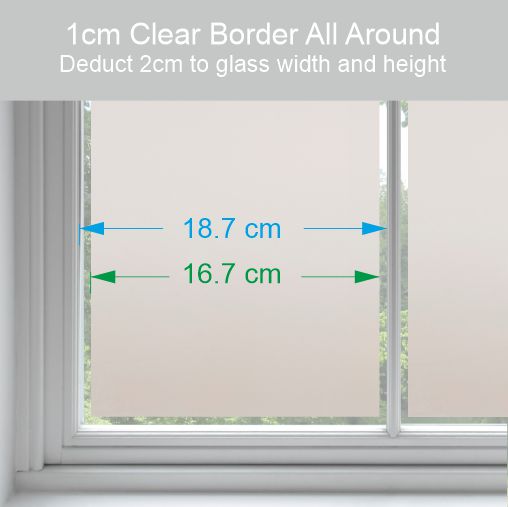
Leaving a clear gap around frosted or patterned film is a stylish and practical option, allowing you to peep out when someone is at the door for example. To create a clear outline around the film, deduct twice the width of the desired clear outline, to the width and the height of your pane.
For example, if you want a 1cm (10mm) clear gap all the way round, deduct 2cm from the width, and the same from the height.
Fitting the film with a gap all the way round is much easier, especially on old wooden windows and doors which are not always in the best condition, and where the edge of the glass has paint encroachment.
Window film is very easy to look after and you won't need any special products to clean it with. In fact, soapy water, similar to the solution you used to apply the film is the best cleaning product.
Wait for at least 3 weeks before first cleaning your film
Use soapy water
Use a soft cloth or paper towel
Use a rubber edged squeegee (unless the film is printed or has cut outs) in good condition
Do not use abrasive products
Do not use Amonia based products
Do not use defective or damaged squeegees
Extra care must be taken when cleaning printed films, or films which have been cut out and have exposed edges. Gently clean with a soft cloth only, and take particular care around the cut areas. Do not rub too hard or use a squeegee as it could damage the print or your cut film.
Take extra care around the edges and clean your sticker or film from the centre out. Do not use a squeegee.